 |
| Changed domain to www.nmwardani.com |
Congratulations to my self! This blog’s domain has changed to www.nmwardani.com. Choosing a custom domain is a step for me to set this blog up to a more professional one. I initially thought it would be complicated, but with the help of my blogging coach Mbak Marita, I found it easy. You can also check her tutorials here. It is in Bahasa Indonesia, or if you prefer English you can follow the steps below.
Why I Changed Domain to .com
Choosing a custom domain is one important step for our blog to be recognized as a professional one. It is not compulsory, however. You can choose to stay with blogspot or have another domain.I think one most important reason to have a custom domain is that I can choose a shorter one and something much easier to remember and to type. You can imagine if I stay with nmwardani.blogspot.com, my url will be at least 22 characters, not including https:// and the title of the post. Instead, www.nmwardani.com is 17 characters. You might think ,”Hey, it’s only 5 characters different!” Yes, but 5 characters can be a huge difference. You can add one more word for SEO optimization.
Also it looks nicer. :)
You might also be interested in:
- How to increase page views of your blog
- Blogging with Blogger app
- Get your blog more audience with social media
- How to make time for blogging
Why Choose .com?
Other than .com, you can actually choose from a wide range of custom domain names, such as .id, .xyz, .net, .club, .my.id, etc. I choose .com, because it is easier to remember, like people would remember a website as bla-bla-bla.com, right? And also I often encountered problems myself remembering several websites that have a domain other than .com as their domain name. In this case, I would go back to Google Search to find the correct domain name. Well, I want you, readers, not to get into that trouble, so I choose .com although it is a bit more expensive. 😊Expensive?
Yes, if you want to have a custom domain, you have to buy it.
How to Set the Domain
First thing to do, so that you can change the domain name, is that you need to buy it. There are many providers available. You can just check “buy domain” in Google (or its equivalent in your home country language) and you will see there are many offers. You can also buy the custom domain directly from Google, from the setting part. I guess there is only a little difference between them. You can choose any that fits you.I bought my domain from niagahoster, because I already had one account there and I needed to extend the domain www.nhbookstore.com registration at that same date, so I continue to buy another one in niagahoster.
Niagahoster is not the cheapest offer, but the steps are the easiest I know so far. The website is also super user-friendly and the chat assistants are all fast response.
If you are a first timer, you will need to sign up for a niagahoster account. Proceed like you want to buy from an online shopping website, fill the forms, confirm by your email, and once done they will bring you to the member area or panel. You can order domain there, and pay, exactly like when you want to shop online at other places. I will give more detailed info in another post, insyaAllah, but in this post, I would like to focus on setting the custom domain up in blogger.
 |
| Click Order Domain |
Setting Your Custom Domain in Blogger
Once you buy the domain, you can see the domain is active in the panel or Member Area.Then you click the manage domain or "kelola domain", click the DNS part.
 |
| DNS |
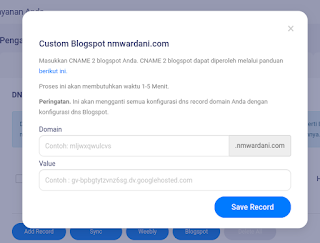
Click Blogspot and a form pop up to make the second CNAME will appear. Instruction in pop-up is clear with example of what you need to enter.
 |
| Custom Blogspot Pop-up |
At a separate tab, go to your blogger dashboard, click setting. And choose custom domain.
A message will appear there, do not close it. The message will show you your name and destination for your second CNAME, you will enter it in the previous niagahoster tab (the one I covered with black ink). Copy the name and destination, and paste it to the field in niagahoster pop up I mentioned previously, name and value. Then click save record.
 |
| Name and Destination for Second CNAME |
You will see a pop up shows success (hooray!) If you notice in the DNS, your records are two cnames and A records are automatically generated. If you use other service, you might need to make them manually, you may check for Mbak Marita's tutorial in the first paragraph above.
Go back to your blogger tab, and also click save.
 |
| Congratulation! Custom domain is sucessfully set up |
Don't forget to redirect your blogspot to your new custom domain, and also activate https.
 |
| Redirect to custom domain |
That’s it! Your custom domain blog is ready. If you try immediately to access the new blog with the new custom domain, it might show you an error page. Don't worry. It will take some time to access your blog. Wait at least 15 minutes for it to work.
If you choose other service than niagahoster, there might be slightly different steps in changing your blogspot into a custom domain. Don’t worry, there are many tutorials out there for different service.
Anything challenging? No. I personally think it is very easy. I don't have any problem doing this. Everything went very smoothly.
I hope after I changed the domain into .com, my blog will look more professional and people give more trust to this blog. I expect to have more visitors, and in other words, I will need to be a better and better writer. 😁
See, having a custom domain to your blogpsot is just that easy. May this post be helpful for you, if you want to change you domain into .com. If you need help, comment below, or contact me. See you in the next post.
See, having a custom domain to your blogpsot is just that easy. May this post be helpful for you, if you want to change you domain into .com. If you need help, comment below, or contact me. See you in the next post.


Congratulations on your new domain! It looks nicer and professional :)
ReplyDelete